Viewing a client
The client view page (/clients/view/{id}) is the single place where everything about one client lives — financial summary, contacts, addresses, credit balance, and links to all their quotes, invoices, and payments.
You land on this page after creating a client, and from anywhere a client name is shown as a link.
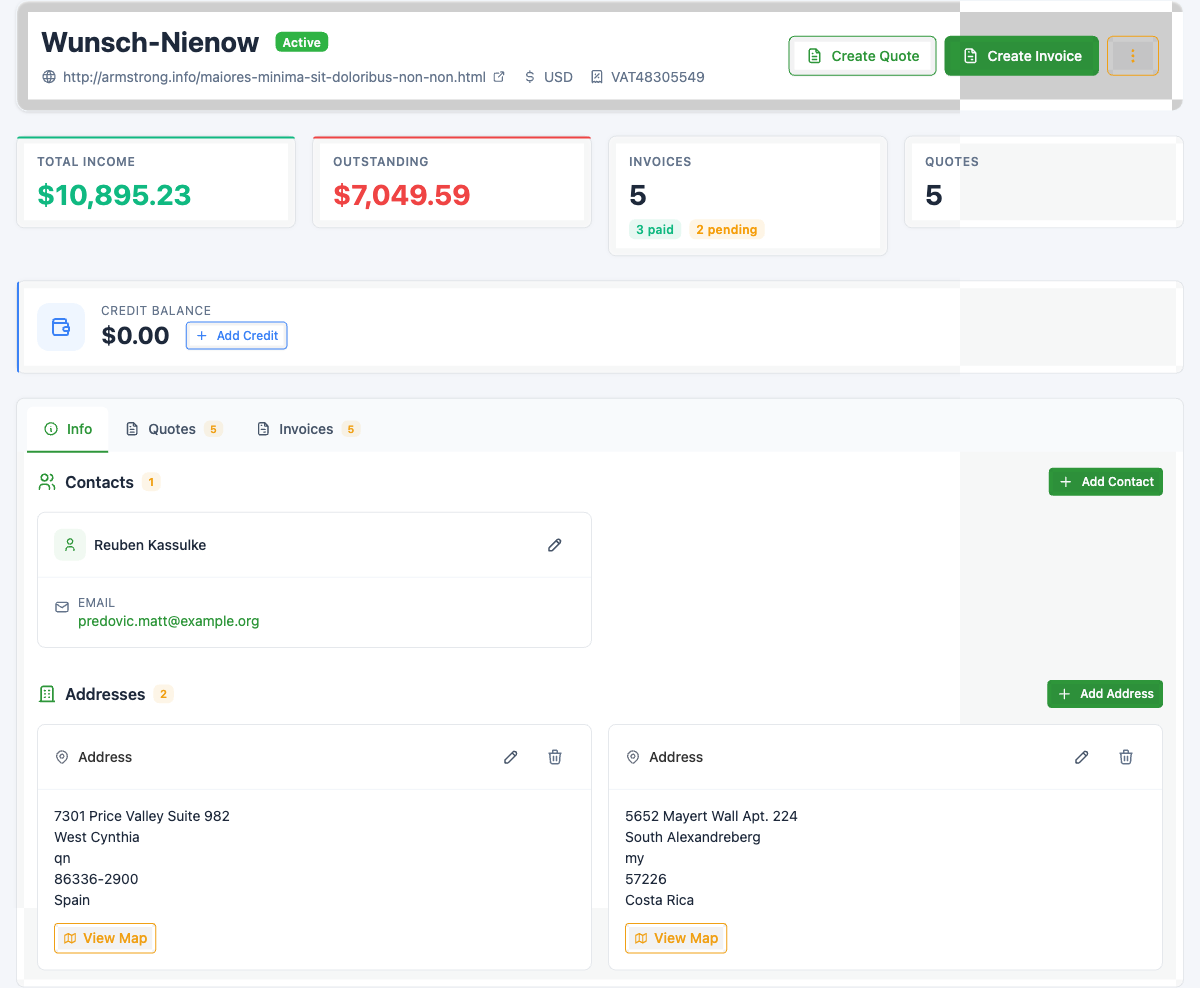
Page header
The top of the page shows:
- The client's name as the page heading, with an
ActiveorArchivedstatus badge. - Below the name: the website (if set, with an external-link icon), currency code, and VAT number — each prefixed with a small icon.
- Three action buttons on the right:
Create Quote,Create Invoice, and a three-dot menu containingEdit(opens the create form populated with this client's data) andDelete.
Financial metrics
A row of four cards summarises the client's billing relationship with you:
Total Income— total amount of payments received from this client, formatted in their currency.Outstanding— total unpaid balance across all their open invoices.Invoices— count of invoices, with a small breakdown of how many arepaidandpending.Quotes— count of quotes you've issued this client.
The Total Income and Outstanding numbers are coloured green and red respectively for quick scanning.
Credit balance
A dedicated card sits below the metrics row showing the client's current credit balance and an + Add Credit button. Credit is a prepaid balance you can hold on the client's account and apply later when they pay an invoice. The full feature is documented separately on Client credit.
Tabs
The lower half of the page has tabs:
Info(default) — shows theContactsandAddressescards.Quotes— every quote issued to this client, with status and total. Counts shown in a badge on the tab.Invoices— every invoice for this client, with status and total. Counts shown in a badge.Payments— appears only when at least one payment has been recorded against the client.
Each of the document tabs is a list with the same row actions as the global Quotes / Invoices / Payments pages — see those areas of SolidInvoice for the per-document operations. From the client view, you can read the lists and click through to individual documents; you can't edit invoices or quotes inline here.
Contacts
The Contacts card on the Info tab lists every person you have on file for the client. Each contact card shows:
- The contact's name (first + last) at the top, with a pencil
Editicon. - Below it, every additional contact detail tagged by type — for example
EMAIL,MOBILE,PHONE— with the value rendered as amailto:ortel:link where applicable.
A contact must always have at least one of: First name, Last name, Email. The Email row in the additional details list is required by default.
To add another contact, click + Add Contact at the top right of the card. The same form used during create opens — fill in name + email + any additional details and save.
To delete a contact, edit the contact and use the delete control inside the form. SolidInvoice prevents you from deleting the last remaining contact: a client must always have at least one.
Additional contact details
The Additional Contact Details block on each contact captures any number of Type + Value pairs.
Out of the box, three types are available on a fresh installation:
email— required, validated as an email address.mobile— optional, free text.phone— optional, free text.
The set of types is shared across all contacts in your company. Adding new contact types (for example, Twitter, Skype, or Fax) currently requires direct database changes; there is no in-app management screen for the type list.
Addresses
The Addresses card on the Info tab lists every address recorded for the client. Each address card shows the formatted address (street, city, state, zip, country) and three controls in its header: Edit (pencil), Delete (trash), and a View Map button that opens the address on an external map service.
Click + Add Address to capture a new address. Fields are the same as during client creation — see Creating a client → Address Info.
There's no billing-vs-shipping distinction on the address itself — the list is flat. When generating documents, the first address is used by default; pick a different one on the document if needed.
Editing the client
Use the three-dot menu in the page header → Edit to update the client's company-level information (name, website, currency, VAT number). The same form is used as during create, with all fields pre-filled. Contacts and addresses are managed inline on the view page (+ Add Contact, + Add Address, edit and delete on each card) — you don't need to open the edit form to manage them.
Related
- Client credit — adding, deducting, and applying credit.
- Client currency — how the per-client currency choice affects quotes, invoices, and payments.